Download and install
- Downlaod and install dependencies
- Python
- Metasploit
- Arpspoof (part of dsniff)
- Nmap
- Selenium
- cd pynetsim-0.1
- mkdir requirements
- wget http://selenium.googlecode.com/files/selenium-remote-control-1.0.3.zip
- unzip selenium-remote-control-1.0.3.zip
- add selenium-python-client-driver-1.0.1/selenium.py to your PYTHONPATH or copy it to src/
- Firefox
- Skype
- Skype4Py
- Download PyNetSim from here
- Unpack it
- Copy it to the desired place
- Edit src/netsim.conf
- that's it :)
Configuration
You need edit netsim.conf and change it to your needs. At the moment it is mandatory to keep all entries even if you do not use the module. This is a known problem and will be fixed in future releases! There is a fully commented netsim.conf.sample file located at doc shipped with the release. But you can also take a look at it here.
Typical setup
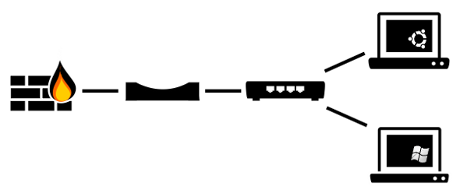
PyNetSim is intended to be used on different machines a typical setup looks like this:

On the bridge tcpdump is used to dump the traffic, but you can also directly use any anomaly detection system. On each host an instance of PyNetSim is running. And in this setup the windows box is also the target. You can place any amount of computers running PyNetSim on any place of the network to simulate different attack szenarios. PyNetSim deploys its power on virtual machines because you get a very cheap system to generate and dump the desired network dump.
Virtual Box setup
For the setup shown in the diagram above create four machines. To set up the network you can attach two network adapters to the firewall/router one using "NAT" and one using "internal network" give the internal network a name like pynetsim.private.wan. Afterwards you can setup the network of the brige by attaching two network adapters and for one use internal network pynetsim.private.wan and for the other pynetsim.private.lan. Now you can setup the network of your clients. Just attach one network adapter and choose internal network pynetsim.private.lan.
Bridge setup
You can set up a bridge on a linux box with the following commands:
 ifconfig eth0 -arp promisc 0.0.0.0 up
 ifconfig eth1 -arp promisc 0.0.0.0 up
 brctl addbr br0
 brctl addif br0 eth0
 brctl addif br0 eth1
 ifconfig br0 -arp promisc 0.0.0.0 up
Best practice is to use the bridge to collect the network traffic with it. You can afterwards alter your algorithm and test it again without the need to rerun the time consuming traffic generation. I used this tcpdump command to collect my traffic.
tcpdump -i br0 -G $((60*60)) -z bzip2 -w capture%Y.%m.%e-%H:%M:%S.pcap
Firewall
You can use any firewall you like. I used endian firewall.
Clients
Follow the steps described above and install it on each client. Make sure you have privileged rights to use the anomalygenerator module. The Skype module is known to crash on virtual machines. If you like to play with Skype you need to use a real machine! For writing your own mfsconsole rc files please consider the metasploit documentation.
Logging
PyNetSim creates log files containing information of what it does. This is very useful, because you get a lot of information about the network dump. This also helps you to create statistics with false positives and false negatives. Because of the design of PyNetSim there are still some untracked anomalies like windows or linux updates. But you can alter your system configuration to change that behaviour.
Creating your own modules
Writing your own modules for PyNetSim is easy. Take a look at doc/moduletemplate.py for kick start.
Future
Because more and more attackers exploiting the webbrowser it is planned to add a generator for such kind of attacks later. It should be no problem because everything is ready for it.
Also I will upload a complete setup of appliances (without windows) and my pcap files, as time permits.
Consider to share ;)
Please also consider to share and upload the generated pcap files for others to use!
Have fun!
I hope this software is of any use to others and that they have the same fun using it as I did :)


